

I use Nuwtonic SEO for client work at Lede, but I found almost no onboarding material to explain how its many modules fit together. I don’t work for Nuwtonic, and I didn’t make its product walkthrough. I worked through the tool myself and wrote the guide I wished I’d had.
Heads up: some links in this post are affiliate links. If you buy through them I may earn a commission, at no extra cost to you. I only recommend tools I actually use for client work.
Key takeaways
- Connect Search Console for ongoing work, or choose Lead magnet workspace for research without GSC access.
- Check prompt frequency and remaining quota before starting manual runs.
- Correct Brand analysis and Preset settings before generating client drafts.
- Test one page through the chosen integration before applying bulk changes.
Table of Contents
- Step 1: How do you create a workspace with “Add workspace”?
- Step 2: Can you use “Lead magnet workspace” without Search Console?
- Step 3: Where do you add tracking queries in “AI search visibility”?
- Step 4: How do “Prompt run” and “View prompt breakup” work?
- Step 5: How do you turn “Dashboard” findings into work with “Find gaps”?
- Step 6: What should you inspect in “Prompt fan-outs” and “Citation”?
- Step 7: When should you generate recommendations in “Off-page GEO”?
- Step 8: How do you use “GEO audit & fix” without accepting every change?
- Step 9: How do you connect analytics in “AI Impact”?
- Step 10: Where do you research rivals in “Competitor Gap”?
- Step 11: Where are the research settings in “Keyword Intelligence”?
- Step 12: How do you expand a content plan in “Topical map”?
- Step 13: What should you correct in “Brand analysis” and “Preset”?
- Step 14: How do you draft and edit through “Content Agent” and “Planner”?
- Step 15: What should you check in “SEO performance”?
- Step 16: How do you use “Keyword ranking,” “Share report,” and “SEO audit & fix”?
- Step 17: How do “Search Canvas” and “Auto Traffic Campaign” help prioritize work?
- Step 18: Which option should you choose in “Integrations”?
- Step 19: What remains in “Settings,” “Optimization history,” and “Subscription”?
Step 1: How do you create a workspace with “Add workspace”?
A workspace is the home for one domain. Research, audits, content, and reporting for that site live inside it.
I prefer the Google Search Console connection for ongoing client work because it gives Nuwtonic actual search performance data to work with, rather than relying only on its analysis of the website.
- Click Add workspace.
- Choose Authorize Google Search Console.
- Select the Google account with access to the relevant Search Console property.
- Continue through Google’s permissions screen and grant access.
- Select the property from the list, then create the workspace and complete the setup fields.
- Open the new workspace card to enter the domain’s dashboard.
Previously connected properties appear as imported. If a property is missing, check the Google account used for authorization before trying again.
The GSC-connected workspace opens on SEO performance. That dashboard draws on Search Console data and adds Nuwtonic’s interpretations, alerts, and suggested opportunities. I treat those suggestions as starting points for investigation, not findings that are automatically correct.
Step 2: Can you use “Lead magnet workspace” without Search Console?
For prospect research, I don’t always have Search Console access. Lead magnet workspace is the alternative route.
- Choose Lead magnet workspace.
- Enter the workspace name and domain.
- Choose the target country and language.
- Add the brand logo and colors if available.
- Click Start the setup and wait for initialization to finish.
This route opens on the on-page SEO audit screen. It also provides access to AI search visibility, content generation, competitor gaps, and keyword intelligence.
No GSC connection does not mean every report becomes available without another connection. AI Impact still needs Google Analytics 4. Search Console-based analysis still depends on Search Console data.
The video doesn’t give a reliable setup duration. I would separate creating the workspace from waiting for its data and analyses to become ready, rather than promise a particular number of minutes.
I’ve included Nuwtonic’s full product walkthrough here as a companion to the written instructions. The steps below follow the demonstrated workflows, with the unclear parts called out.
Step 3: Where do you add tracking queries in “AI search visibility”?
AI search visibility tracks how a brand appears in responses from AI search engines. This is the GEO side of the tool, meaning generative engine optimization.
- Open AI search visibility, then Add prompts.
- Review the suggested prompts and click Add beside relevant ones.
- Open Manage prompts to see the saved selection.
- Add custom prompts for important questions missing from the suggestions.
- Edit or delete prompts that don’t match the brand’s audience or offering.
The suggestions cover top-, middle-, and bottom-of-funnel questions. Those are genuinely different research needs: early learning, comparing options, and deciding what to buy.
I wouldn’t add everything simply because it is suggested. A smaller set of commercially relevant questions is easier to interpret than a large collection loosely related to the business.
How does tracking frequency affect the allowance?
In Manage prompts, use the frequency settings to choose how often tracking runs.
The walkthrough gives an illustrative allowance of 20 monthly prompt runs: 20 prompts checked monthly, 10 checked every 15 days, or five checked weekly. This is an explanation of the trade-off, not a statement of current plan limits.
More frequent checks leave room for fewer distinct prompts. Check the allowance attached to the account before setting the schedule.
Step 4: How do “Prompt run” and “View prompt breakup” work?
Adding a prompt and running a prompt are separate actions. That distinction is easy to miss at first.
- Open Prompt run.
- Allow scheduled processing to run the saved prompts, or choose Manual run.
- For an immediate check, click Run now.
- After processing, open View prompt breakup for a particular prompt.
Manual runs count against the prompt quota. Repeatedly clicking them is not a free way to refresh the dashboard.
The run list shows metrics such as brand coverage and average position. The prompt-level breakdown goes deeper into competing brands, share of voice, mention share, and positions across the engines included in that run.
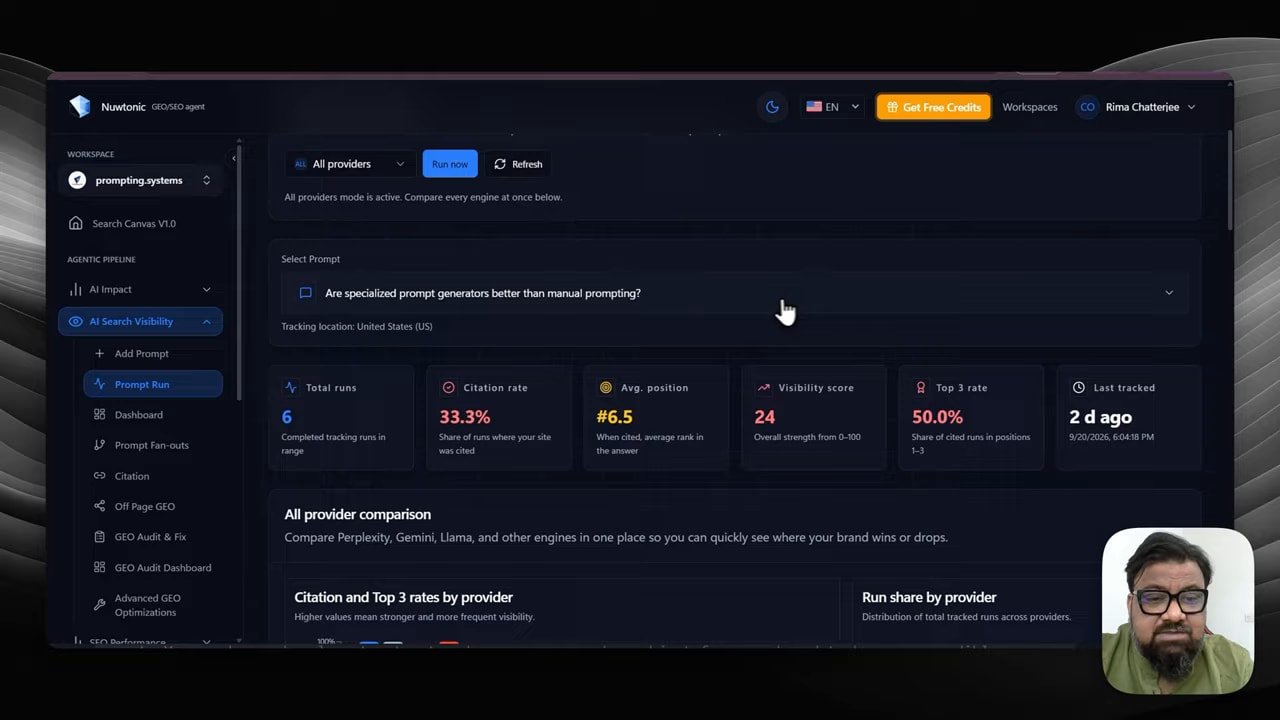
I use the individual breakdown before relying on the aggregate dashboard. It is easier to understand a weak overall visibility figure after checking which specific questions and competitors are behind it.
Step 5: How do you turn “Dashboard” findings into work with “Find gaps”?
Once several prompts have run, Dashboard pulls together visibility and mentions across the tracked set. It also shows competitors appearing alongside or ahead of the brand, plus brand analysis covering positioning, presence, reputation, and sentiment.
The useful part for my content work is the route from a competitor finding to an actual page decision.
- Open Dashboard and review the competing brands.
- Click Find gaps for a relevant competitor.
- Review the suggested quick wins and higher-growth opportunities.
- If no relevant page exists, choose Create content to send the topic to Content Agent.
- If a relevant page already exists, enter its URL and choose Advanced optimization.
Check for an existing page before generating another article. A gap in visibility does not necessarily mean a gap in the content inventory.
This connection between research and execution is where I find the tool useful. It reduces the handoff between identifying an opportunity and preparing a draft or a proposed revision. It does not remove the editorial decision about which action makes sense.
Step 6: What should you inspect in “Prompt fan-outs” and “Citation”?
The initial prompt is only part of the research. Prompt fan-outs exposes related queries associated with the prompt runs, while Citation shows the pages being cited.
- Open Prompt fan-outs to review the related queries and domains appearing for them.
- Select an individual prompt to narrow the report.
- Apply the available filters to focus the analysis.
- Open Citation to compare cited pages from the brand and its competitors.
- Use Show more to expand the citation list, or filter by prompt to inspect a particular response.
I use fan-outs to understand the surrounding questions a page may need to answer. I use citations to inspect the actual source pages, rather than infer everything from a competitor’s domain name.
The citation report includes citation totals, unique pages, and competing sources. The prompt-specific view adds context about what the AI response cited and which URLs supplied that material.
These are research clues. A cited page is worth examining, but copying its structure or publishing on the same topic is not a guarantee of being cited.
Step 7: When should you generate recommendations in “Off-page GEO”?
On-page changes are only part of the workflow. Off-page GEO suggests activity elsewhere that could help build the brand’s presence.
- Complete at least 10 prompt runs, as recommended in the walkthrough.
- Open Off-page GEO.
- Generate the recommendations, checking the displayed credit cost first.
- Open individual recommendations to inspect the proposed activity and destination URL.
- Filter the list and keep only actions that fit the brand and platform.
The demonstrated generation costs 50 credits. I would check the live interface before assuming that cost still applies.
Recommendations can include replying to a relevant discussion, publishing a related Reddit or LinkedIn post, creating a YouTube video, or pitching inclusion in an existing article.
I would not execute these indiscriminately. The walkthrough explicitly calls for human judgment, and that matters here. A suggested discussion is not automatically a suitable place for a brand contribution.
Step 8: How do you use “GEO audit & fix” without accepting every change?
GEO audit & fix assesses an individual page for AI search readiness. The completed audits appear in GEO audit dashboard.
- Open GEO audit & fix and enter the page URL.
- Run the audit.
- Open the result in GEO audit dashboard.
- Select Advanced GEO optimization for a deeper set of proposed fixes.
- Review the explanation and exact placement of each change before applying it.
The advanced report divides the work into three types:
- Technical fixes: changes to titles, meta descriptions, and related page elements.
- Content fixes: additions or replacements tied to particular H2 or H3 sections, along with explanations, links, alt text, or structural changes.
- Manual and compliance fixes: work requiring a person, such as adding accurate author details, relevant imagery, or a useful calculator.
I find the section-level instructions more useful than a generic recommendation to “improve content.” Knowing where a change belongs and why it is proposed makes review more practical.
Nuwtonic describes the optimization system as informed by a Google AI search patent. I treat that as the vendor’s description of its approach, not evidence that a particular change will earn an AI citation.
The video goes past implementation quickly, but generating a fix and applying it to the live site are different parts of the process. The integration method matters, which I cover below.
Step 9: How do you connect analytics in “AI Impact”?
AI visibility and AI referral traffic answer different questions. A brand can appear in a response without receiving a visit. AI Impact uses GA4 to examine the visits that do arrive.
- Open AI Impact and connect the relevant Google Analytics account.
- Review AI sessions, engagement, traffic share, and reported AI sources.
- Compare organic search and AI traffic at page level.
- Open Landing pages and select an individual page.
- Inspect engagement, device, country, and onward navigation.
Key events and revenue depend on those being configured in GA4. The demonstration account does not have them configured, so it does not establish a revenue result.
I pay particular attention to where visitors go next. If an informational article sends relevant readers toward a signup or service page, that is a useful path to examine.
Within Landing pages, sort by engagement duration or pages per session to find pages worth a closer look. Add relevant internal links where they help the reader continue, rather than forcing every article toward a sales page.
The walkthrough also suggests comparing pages that perform well in conventional search but weakly in AI referrals. I see that as a sensible way to prioritize research, not proof that the page needs a specific GEO fix.
Step 10: Where do you research rivals in “Competitor Gap”?
The standalone Competitor Gap module provides another starting point for opportunity research, independent of choosing a competitor from the AI visibility dashboard.
- Open Competitor Gap, then Know your competitor.
- Review the suggested competitors.
- Add known competitors missing from the list.
- Open Opportunity gap.
- Select the competitor, country, and language, then click Find gaps.
- Use History to reopen a previous analysis.
The suggested competitor list comes from Nuwtonic’s interpretation of the brand and niche. I check that interpretation before spending credits on deeper analysis.
A previous report does not need to be rerun just to reopen it. History is the less obvious but useful control here.
As with the dashboard workflow, an opportunity can lead to new content or optimization of an existing URL.
Step 11: Where are the research settings in “Keyword Intelligence”?
Keyword Intelligence starts with a seed topic, location, and language. It then connects the research to clustering and content briefs.
- Open Keyword Intelligence and enter the seed keyword or topic.
- Set the target location and language before running Keyword research.
- Use the available filters and deeper analysis controls to inspect the results.
- Open the clustering view to review grouped keywords.
- Choose a relevant opportunity and open Content blueprint to build an outline.
- Use Generate content to send the brief to Content Agent.
A narrow, long-tail seed may return a much smaller list than a broad topic. That is not automatically an error. The walkthrough explains that the tool does not pad the output just to reach a large keyword count.
I would broaden the seed when the purpose is topic discovery, then narrow the resulting opportunities during editorial planning.
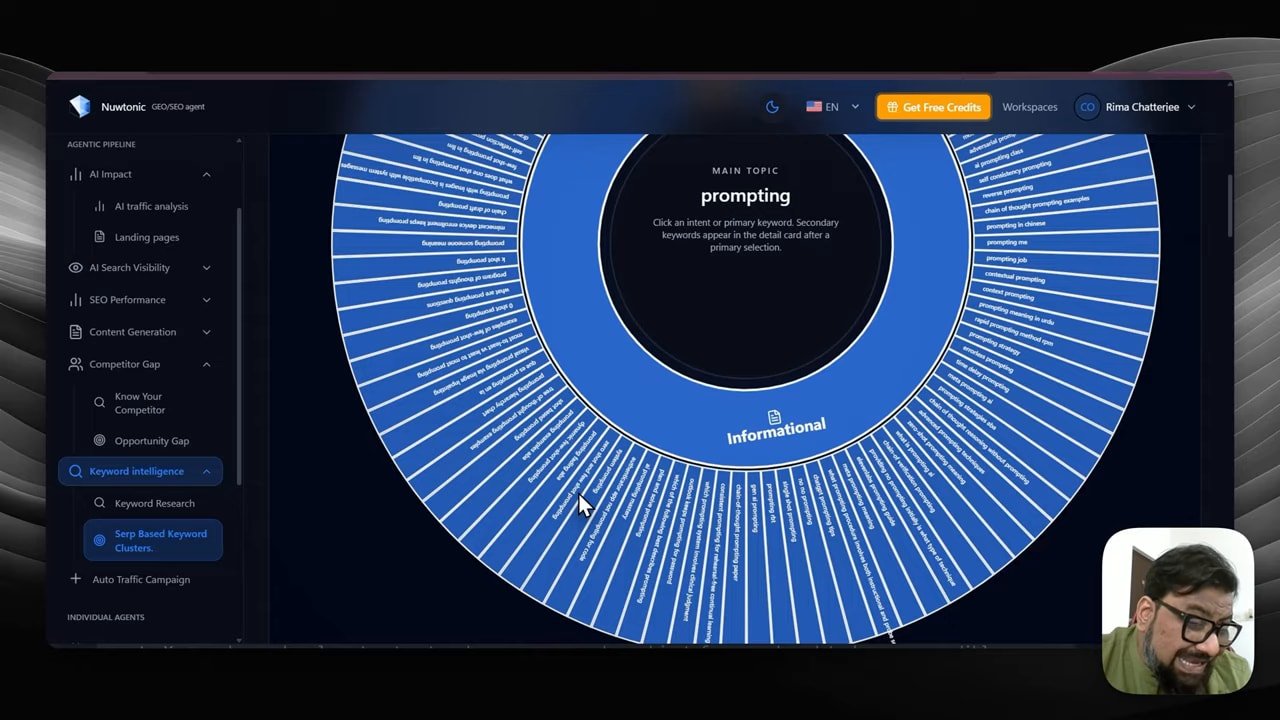
The clustering process is intended to remove exact and semantic duplicates, group related terms, and suggest heading relationships. Individual opportunities identify primary and secondary keywords.
The blueprint then adds proposed subtopics, their intent, and related semantic terms. I still check whether a proposed article overlaps an existing page. A keyword group is a planning aid, not an instruction to publish a separate URL for every phrase.
Step 12: How do you expand a content plan in “Topical map”?
Topical map is the broader planning route inside content generation. In a GSC-connected workspace, it uses the site’s existing queries, pages, and performance as context.
- Open Content generation, then Topical map.
- Generate the map and inspect its categories, subcategories, hubs, and topics.
- For a narrower area, click AI cluster.
- Choose Full expansion and enter the specific niche or seed topics.
- Review the expanded map, or switch to the flat-list view.
- Add manual clusters or keywords when the generated map misses an important area.
The map can also be deleted and regenerated. I would make that choice deliberately rather than assume regeneration is simply another view of the same plan.
The walkthrough shows that expansion can produce substantially more topics, but the number depends on the niche and seeds. I care more about whether the map reflects the client’s actual expertise and offering than how large it becomes.
Step 13: What should you correct in “Brand analysis” and “Preset”?
This is the step I would complete before generating client drafts. Brand analysis supplies the context that makes the output brand-specific.
- Open Brand analysis.
- Read the generated overview, selling points, audience, pain points, voice, and messaging.
- Click Edit analysis and correct inaccurate or incomplete information.
- Add the brand logo and color hex codes.
- Open Preset and review the content generation settings, including article length.
The brand profile also includes strategic analysis, brand archetype, and content strategy. I don’t assume those interpretations are right simply because they are written confidently.
Logo and color settings feed into the branded AI images generated with articles. In the demonstration, the brand name appears when a logo has not been added.
The video goes past Preset quickly. It establishes that this is where article-length and other generation preferences live, but it does not explain every option. I would inspect those settings before the first substantial generation run rather than assume the defaults fit the brief.
Step 14: How do you draft and edit through “Content Agent” and “Planner”?
Content can arrive in Content Agent from a gap report, keyword blueprint, or topical map. It can also start with a manually entered keyword.
- Open Content Agent and enter the keyword or use the topic passed from another module.
- Add instructions in the optional Knowledge panel.
- Select the target country and language.
- Click Generate.
- Open the completed draft in Planner, then open its editor.
The Knowledge panel accepts plain-language instructions, custom input, and details that need to be covered. I see this as the place to add the substance a generic draft would otherwise miss.
Nuwtonic describes its generation process as analyzing conventional search results and AI search responses, then looking for gaps in existing coverage. That is the intended process, not a guarantee that every draft contains original insight.
What needs checking in the editor?
The generated article can include internal and external links, along with two branded AI images in the demonstrated workflow.
Check the external links carefully. The tool may include a competitor when it selects a source ranking prominently for the topic. Those links are editable. I would assess the source’s relevance and support for the claim, rather than keep or remove it solely because it belongs to a competitor.
- Select text to open the editing controls.
- Adjust headings, links, images, and formatting as needed.
- Open AI edit for assisted changes such as improving clarity, rewriting a heading, shortening a passage, or adding relevant context.
- Review any generated image or expanded text.
- Click Save before moving to publishing.
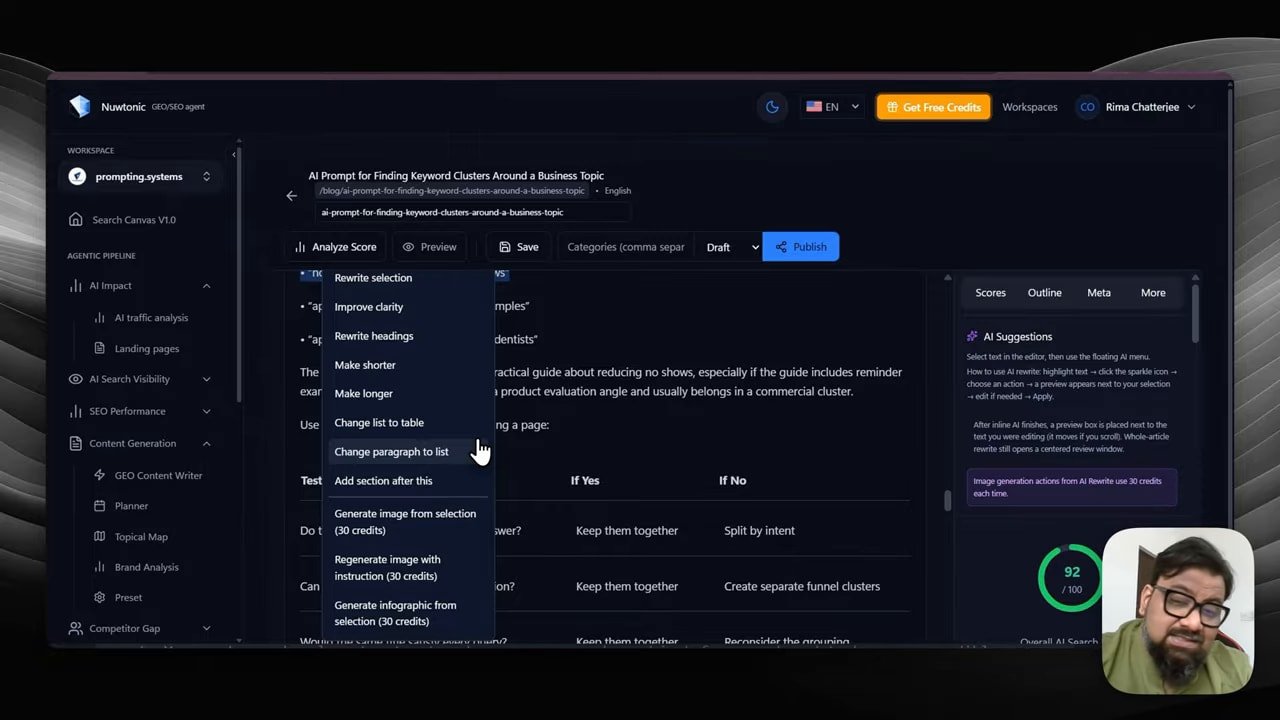
The walkthrough recommends at least a brief human review of generated content and fixes. For client work, I treat that as a minimum reminder, not an editing time limit. Facts, brand claims, and the actual usefulness of the piece still need attention.
Step 15: What should you check in “SEO performance”?
SEO performance > Performance dashboard is the main Search Console analysis area. It includes more than a headline clicks chart, so I work through it by question.
- Open SEO performance, then Performance dashboard.
- Choose the date range before interpreting the reports.
- Review topic strength, cannibalization, CTR opportunities, and page movement.
- Compare device performance and time-based trends before deciding what to change.
Which topics already perform?
Google trust and authority analysis scores topic areas using Nuwtonic’s interpretation of the site’s performance. I do not read the label as a direct statement from Google about trust.
Topical cluster groups queries and shows associated clicks. Add branded keywords where needed to improve the distinction between branded and nonbranded analysis. The dashboard also separates short-tail and long-tail queries.
Are pages competing for the same searches?
Use Cannibalization to inspect keywords associated with multiple URLs. Review the pages and their intent before deciding whether anything needs consolidating or rewriting.
Where are impressions failing to become clicks?
The CTR views separate several useful patterns:
- Impressions with zero clicks: inspect relevance, position, titles, and descriptions.
- High impressions with low CTR: investigate why the listing is not earning a stronger response.
- Low impressions with high CTR: examine whether the topic offers worthwhile expansion opportunities.
- Already high CTR: consider related coverage where it serves the same audience.
I treat those patterns as prompts for investigation. High CTR alone does not establish low competition or prove that publishing more content is the right next move.
Which pages need attention?
Top movers and Growth and decay surface improving and declining pages. Daily, weekly, and monthly trends help establish when a change happened.
A partially completed month should not be compared casually with a full month. The walkthrough itself points this out while reviewing a month still in progress.
Does mobile performance differ from desktop?
The device report can reveal a URL performing differently across desktop and mobile. The example shows a stronger desktop position than mobile position.
The walkthrough suggests investigating speed, layout stability, and interaction responsiveness. I would use the difference as a reason to investigate, not a diagnosis. Google’s Core Web Vitals guidance provides useful context for those checks.
Step 16: How do you use “Keyword ranking,” “Share report,” and “SEO audit & fix”?
Several follow-up actions sit around the performance dashboard. I keep the distinctions clear because similar-looking reports can have different purposes.
- In Overview, select important queries for tracking.
- Open Keyword ranking to inspect GSC-based position, impressions, and CTR. Add keywords manually where needed.
- Use SERP tracking for the separate rank-tracking workflow.
- Use Share report or Share dashboard for client reporting.
- For report branding, open the profile settings and find White label.
White-label settings allow a logo and brand colors to be applied to shared reporting. The video only briefly demonstrates the separate SERP tracker, so I would not infer detailed configuration options from that section.
How do you move from a weak page to an audit?
- Open SEO audit & fix and enter a page URL, or choose the bulk audit option.
- Open the completed result in SEO audit dashboard.
- Click View details to inspect the findings.
- Open Review auto optimization details to see proposed or completed optimization details.
- Choose Advanced SEO optimization for the more detailed technical, content, and manual recommendations.
A “nothing to change” message is not necessarily a failed operation. The walkthrough explains that the tool can return that message when it has no recommended change to apply.
Advanced optimization is also accessible from relevant performance views. I still review the proposed edits rather than assume a declining page needs every available fix.
Step 17: How do “Search Canvas” and “Auto Traffic Campaign” help prioritize work?
These modules turn existing analysis into task suggestions. They are useful when the main problem is choosing what to work on next.
- Open Search Canvas to review the 30-day plan, arranged across weeks.
- Inspect the suggested page fixes, new content, and off-site publishing work.
- Follow the relevant optimization or content-generation action, or download the plan.
- Open Auto Traffic Campaign to inspect pages grouped into optimization opportunities.
- Select appropriate pages and run the advanced fix workflow where justified.
- Review the resulting work in Advanced optimization.
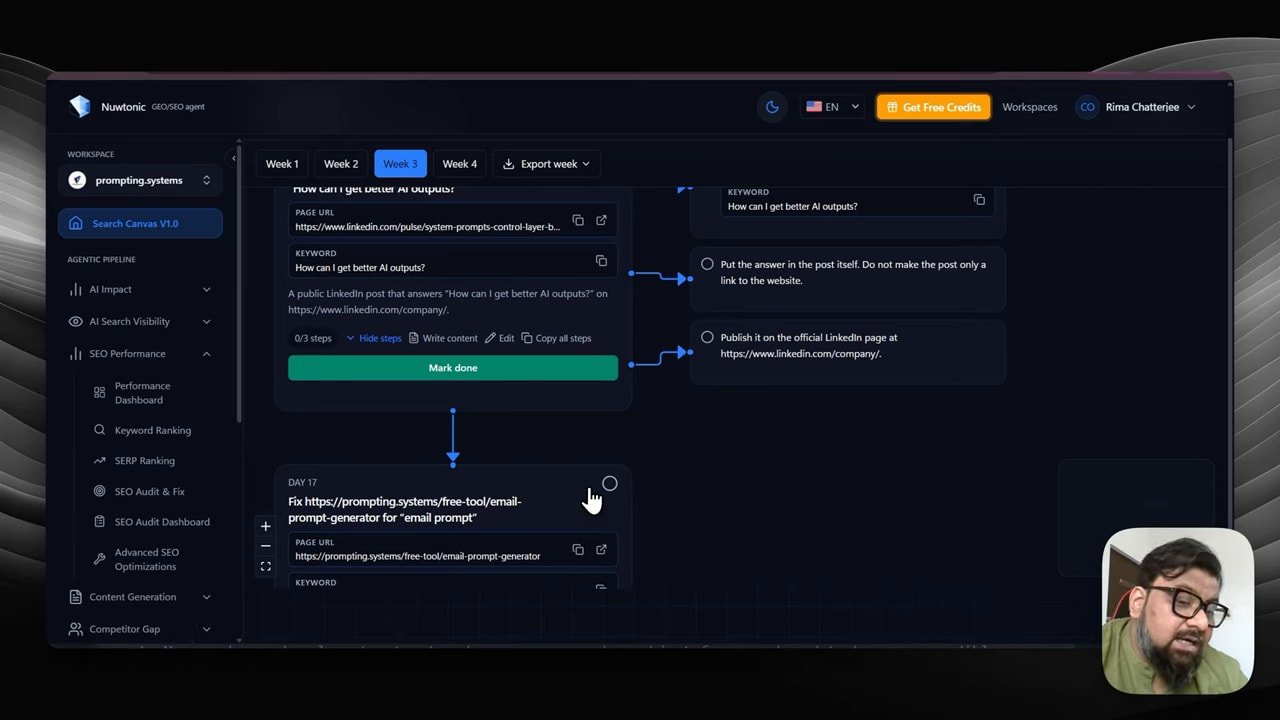
The walkthrough presents Search Canvas as version 1.0. Its plan uses the brand’s existing presence and performance, and the downloaded work can be taken into another tool for implementation.
Auto Traffic Campaign groups pages into campaign categories, including pages not ranking on page one. I would not mistake its name for a promise of automatic traffic. It identifies work; the value still depends on selecting and reviewing that work.
Step 18: Which option should you choose in “Integrations”?
This is the part I would settle before bulk publishing or applying live changes. Integrations includes native connections, webhooks, and a JavaScript route, but they are not interchangeable.
How does the WordPress connection work?
- Open Integrations and choose WordPress.
- Download the plugin, then upload, install, and activate it in WordPress.
- Copy the website ID from Nuwtonic.
- Find Nuwtonic Agent in the WordPress settings area and enter the website ID.
- Run the test connection and complete the connection once successful.
- Test a sample page before pushing bulk changes.
The native WordPress workflow demonstrated officially supports Gutenberg. Elementor, Divi, and more complex plugin or security configurations are not presented as officially supported by that native route.
I would take the sample-page warning seriously. A successful connection does not establish that every layout will survive a bulk update.
When is JavaScript the alternative?
- Open the JavaScript option in Integrations.
- Copy the supplied code.
- Place it in the website header as instructed.
- Test an individual optimization before expanding the rollout.
The walkthrough recommends this route for other site technologies and more complex WordPress setups.
JavaScript-delivered changes depend on the workspace remaining available. The walkthrough warns that deleting the workspace removes the stored optimization data, so those changes do not remain as permanent CMS edits.
What about custom sites and other platforms?
For a custom backend, open the webhook integration, create the secret, configure the receiving endpoint, and enable the connection. This requires backend implementation; it is not simply another publishing button.
Shopify, Webflow, and Ghost connections are also shown. The video points to their setup instructions rather than demonstrating each connection fully. I would follow the platform-specific instructions instead of guessing the missing authentication steps.
If direct application is unsuitable, download or copy the proposed fixes and implement them manually.
Step 19: What remains in “Settings,” “Optimization history,” and “Subscription”?
The final controls are easy to overlook, but they matter for client administration and credit use.
- Open workspace Settings to correct the target country or language.
- Open Optimization history to review recorded optimization activity.
- Open Subscription to inspect current-month credit usage and timestamps.
- Open Teams to invite a colleague by email and assign workspace access.
Team access can be limited to particular workspaces or extended across all workspaces. Members can also be removed from the organization.
What are the separate agents for?
Schema Agent, Meta Agent, Alt Text Agent, and FAQ Agent provide narrower URL-based tasks. Enter the relevant URLs and generate the corresponding output.
These are task-specific tools, not an open-ended chat interface for discussing every page. The walkthrough also says the extra agents were not part of the listed AppSumo offering. I would not base a purchase decision on their inclusion without checking the current terms.
Who is Nuwtonic SEO for?
I find Nuwtonic SEO useful for connected client work: moving from search data or AI visibility research into a content brief, page revision, and report. It suits a consultant or small team prepared to check the brand profile, understand the credit allowance, and review the output.
I would not recommend it as a fully hands-off SEO service. The overlap between modules takes some learning, several settings are not obvious, and live implementation needs testing. It is also a poor fit for anyone expecting guaranteed rankings or finished editorial work without review.
You can get Nuwtonic SEO on AppSumo here.
If having someone handle the SEO content side sounds preferable, I can help through Lede.
Frequently asked questions
What does Nuwtonic SEO actually do?
Nuwtonic SEO connects conventional SEO analysis with AI search visibility tracking, keyword research, content planning, drafting, page audits, and proposed fixes. I use it as a connected research and execution tool, with editorial review between its recommendations and publication.
Is Nuwtonic SEO worth the AppSumo deal?
I find it useful for client work that needs several of its connected workflows. I would judge the deal against the current domain limits, prompt allowance, credits, and supported integration, rather than the number of features alone. The walkthrough does not establish current pricing or guarantee that every extra agent is included.
How long does setup take?
The walkthrough does not provide a reliable setup time. Creating a workspace involves authorization or domain setup, followed by initialization. Analytics connections, brand-profile corrections, prompt selection, and publishing tests are separate pieces of setup, so I would not describe the whole process as a single quick connection.
What is confusing at first?
I find the biggest source of confusion is the separation between adding prompts and running them, followed by the distinction between generating a fix and applying it. Other less obvious controls include Preset for generation preferences, History for previous competitor reports, and profile-level White label settings for reporting.